Sunday, July 29, 2012

Rope Curtain Rod! AND DIY Curtains!


Two posts in one! This week I decided to update our master bedroom curtains...they are only a year old (how old is too old for curtains?) but I will be donating them to little baby Aubrey's nursery since they match so perfectly. I have been searching blogland for unique curtain ideas that are also thrifty. I found exactly what I was looking for on the blog Vintage Revival.  Mandy created an amazing look by using rope and eye-hooks for the curtain rod and canvas drop cloth as the curtains.  This is how it went...

This is what I bought to create window treatments for TWO windows: (L)-Lowes (H)-Home Depot (W)-Walmart (BBB)-Bed Bath and Beyond

2- 4'x15' Canvas Drop Cloth (L) Cost-$37.96
4- Galvanized 1/4 Hex Nuts (L) Cost-$0.56
20' of Rope (L) Cost-$11.60
2-Sample jars of paint in your color choices (L) Cost-$5.96
6- 3/8"x6" eye-bolts with nuts (H) Cost-$6.66
 12- Fender Washers 3/8 (H) Cost-$3.00
6- 2"x2"x1/8" HG Anchor Bolt Square Washer 5/8" (H) Cost-$1.68
2- 6" Boat Cleat (W) Cost-$5.52
Spray Paint-Oil rubbed bronze (W) Cost-$3.67
3- Curtain Rings set of 7 (BBB) Cost-$25.65 (price reflects 20% coupon for each set)

Total Cost: $102.26 (I had a $25 gift card to BBB so the cost was actually less. Make sure you take all of your coupons and gift cards with you to save money!)

You will also need some heavy duty mollies and screws to hang everything. We had those already so I am not sure how much they cost but I know Lowes, Home Depot and Walmart all carry them.


 I bought 4 cleats but only used 2...I am sure I can find a use for the other two... :-)


Here are the mollies and screws I used to hang everything.

First, Curtains...

 First I washed and dried the drop cloth. Then,I laid it out flat and folded it in half. I cut the two halves apart making my two curtains. I folded the cut edge and hemmed it...


I did this for both halves and then did the same for the second drop cloth making a total of four curtain panels...
I then LIGHTLY starched and ironed the panels.

 I laid the curtain over a table (make sure it is a table or floor you can get paint on...the paint will bleed through!)I measured and taped off my stripes. 

I then started rolling out the paint...


There are so many things you could do here...stripes, circles, stencils...You name it! And that's it! Your curtains are done!!!

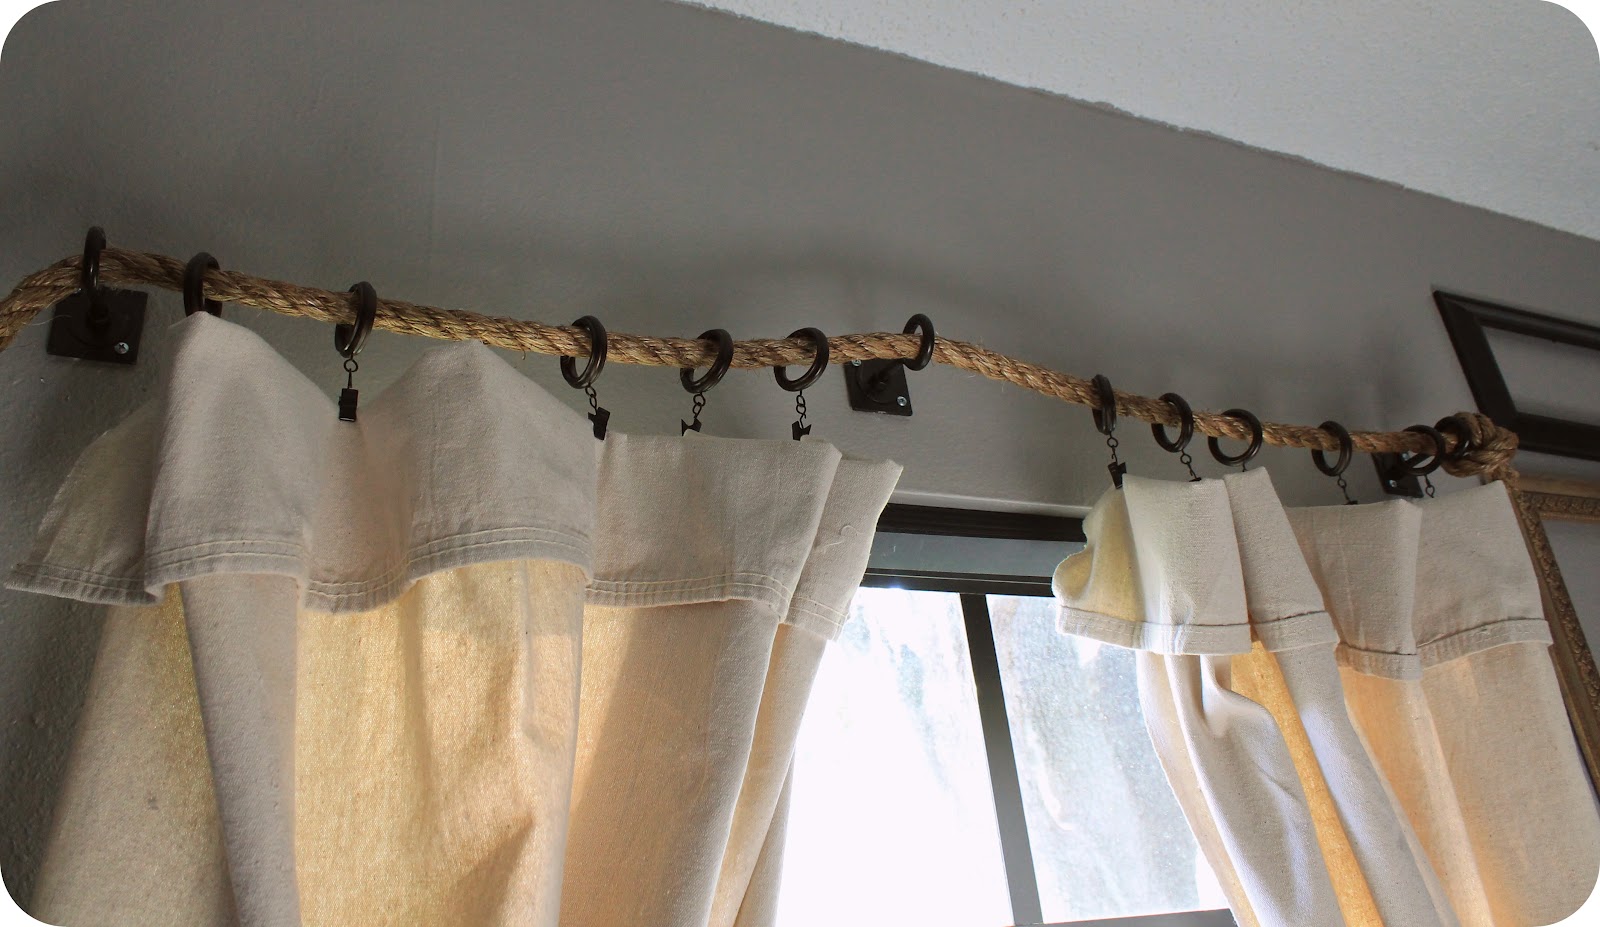
Next, Rope Curtain Rods...

***Before you assemble the eye-hook apparatus drill two holes on opposite corners of the square plate for mounting.  Then spray paint all parts bronze (including boat cleats.) Then assemble eye-hook, nut, round washer, square mounting washer, round washer, nut.  Tighten and cut off excess from eye-hook with bolt cutters. Now that all eye-hooks are assembled, you are ready to mount.  You will need a drill, large drill bit (big enough to create a hole for the rear nut to go into, so mounting plate will lay flush), a level, screw driver and hammer (for the mollies), measuring tape and pencil. Decide where you want them above the window (I went higher since the curtain rings hang down a couple of inches and I didn't want the top of the window showing.) Drill the center hole, put up eye-hook flush and mark where the mounting screws will go.  Then hammer and screw in the mollies, put up eye-hook flush, level and screw in! Do this two more times(measuring and leveling between each) to finish one window.  If you have a second window like I did, repeat the above steps for the second window :-)
Next, cut the rope in half to make 2- 10' pieces. Tie a knot in one end of the rope and string the rope through the eye hooks (it's a good idea to add the curtains rings onto each side at this time)Run the rope completely through and let hang while you decide where to put your boat cleat.  MAKE SURE YOU MOUNT THE BOAT CLEAT WITH MOLLIES(if it does not screw directly into a stud!) If you do not, the boat cleat will rip out of the wall! Mount the boat cleat and secure the end of the rope by wrapping the rope around the cleat. I tied a knot at the end of the rope and frayed the end for and extra touch :-) Now you are ready to clip on your DIY curtains you made and you are done!!!


UPDATE 2016

We decided to freshen up the master (when we replaced the flooring) by adding new curtains with grommets and they look AMAZING on the rope rod!!! Plus, it was SUPER easy to change out the curtains! Just unloop the rope off of the boat cleat and run through grommets.
Wa-La a fresh new look!


This week I also created a fun Chevron sign to hang above the couch...tutorial on that coming soon!

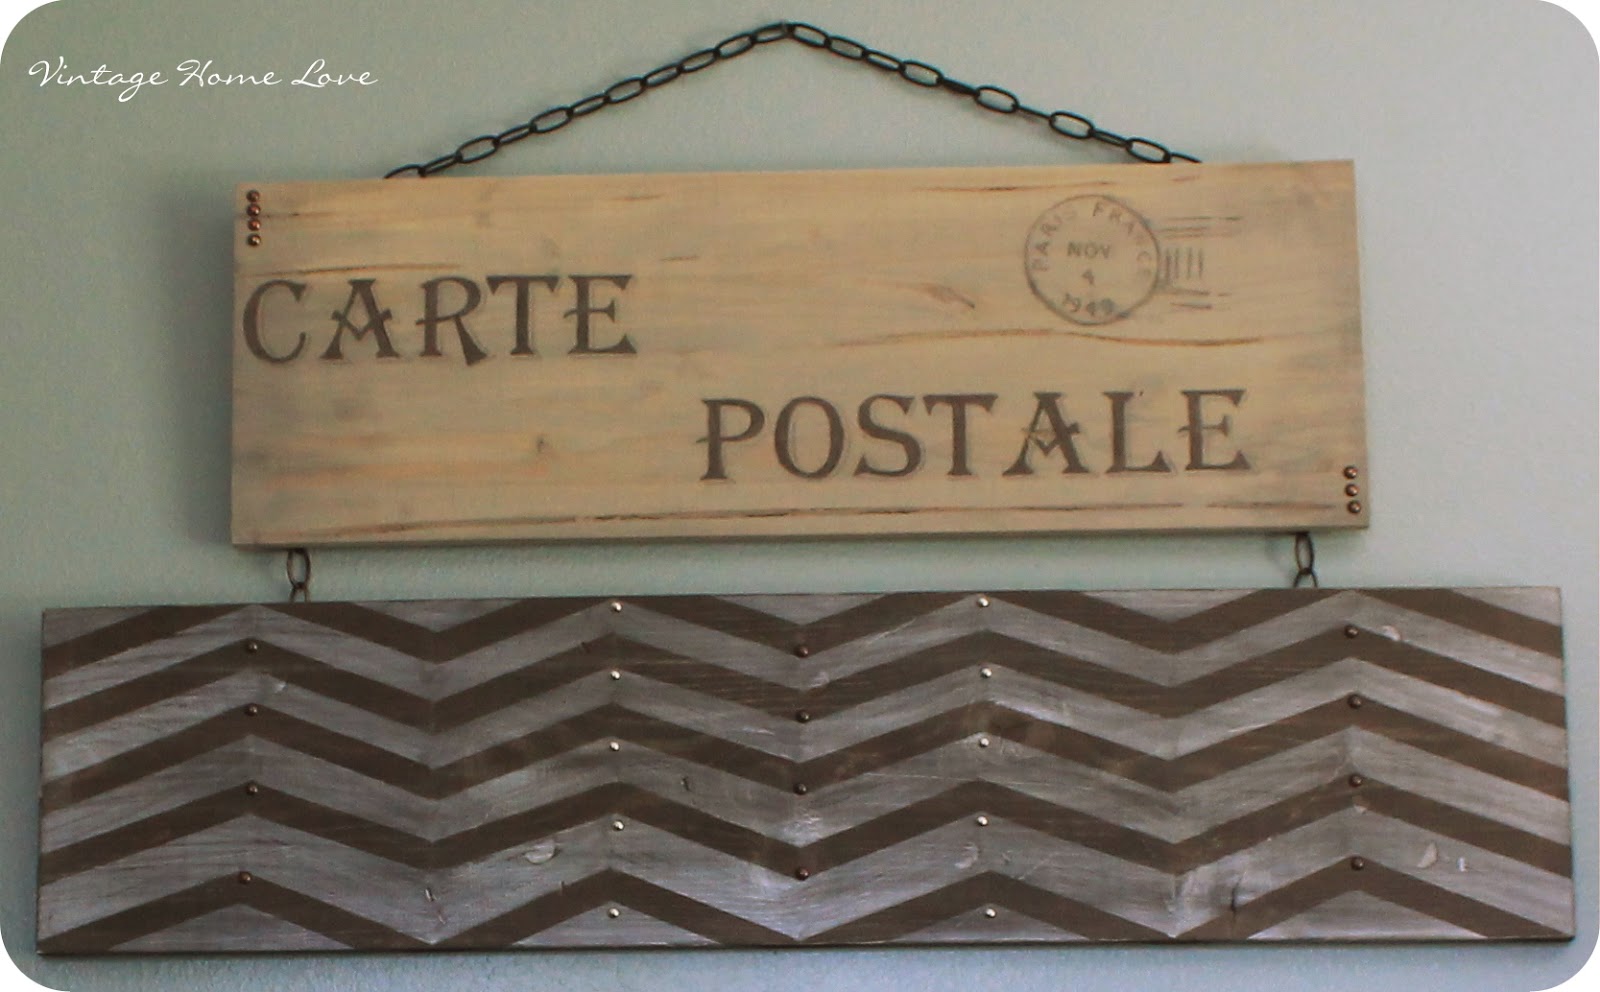
Until then... get creative!

~Jen


Wednesday, July 25, 2012

This is what I do when I am bored...

Summer vacation is relaxing and rejuvenating and can get a little boring if you don't keep busy. So, this morning while watching The Nate Berkus Show I decided to do some rearranging of the living room to spice up the summer. It is such an easy way to completely change the look of your home and it is one of my favorite mood lifters! Let me remind you of the before...


And here is what I did today...


I love the sitting area! Now when guests come over we will have a space to talk! What a difference! I always felt the two couches side-by-side was awkward and this way creates such a cozy atmosphere! What will you rearrange today?

Friday, July 20, 2012

No more point and shoot!

Well folks, its official! I am an Aunt! :-) My pride cannot be contained!!! She is such a beautiful little human and has sparked an love obsession in me for baby photography. Thanks to Pinterest I have LOTS of ideas, but my point and shoot camera was not making the cut. My sister has been using and loving her Cannon Rebel EOS for a couple of years so I decided to take the plunge and I got the Cannon Rebel EOS T3.  
I am in love!
Here are some of my favorite shots of my beautiful niece...


 This is by far my favorite! She looks like a little angel on a cloud :-)


 I made her this little 'baby basket' on a Nifty Nitter.  I used the largest hat loom they make and it worked perfect! I want to make a green one next so she looks like a pea in a pod.


She is such a beauty!!! Every single photo of her was perfect, it was hard to pick favorites! I love this little girl!

Sunday, July 8, 2012

DIY Fire Pit...step by step

Ever since we moved in Andy has wanted a fire pit; we just didn't know where to put one.  We have several large oak trees and would hate to catch one of those bad boys on fire...So, when our beautiful tangerine tree ( which my Grandmother planted) got sick with root fungus and died we were extremely upset but saw a silver lining.  Where the Tangerine tree stood would make a perfect spot for  a fire pit.  Andy researched and planned and enlisted the help of two awesome friends, Chris and Katrina.  It took about a day and a half and was totally worth braving the Florida heat to complete our masterpiece...
How did we do it? I am so glad you asked...I took pictures throughout the whole process to be able to give a detailed account of how to create your very own fire pit! Here we go!

Step 1: 
Finds some friends...to help of course!
 We found Chris and Katrina! They were so awesome to come out and help on a hot summer day! 

Step 2: 
Once we decided where we wanted our fire pit and how big. Andy drove in a stake in the middle of where we wanted the pit and attached a string to it. Then, he tied the string to a can of spray paint (I had a ton for him to pick from) and sprayed as he walked around the circle keeping the string pulled tight.  Then he did the same thing for the outer gravel seating area. This marked off the areas we would dig out.

Step 3:
We started digging out the inner fire pit circle first.  We wanted to go down about 6 inches, so we all got a shovel and got to work!

Step 4:
Once our pit was dug out about 6 inches we laid in 8 bags of pea gravel picture below...
Then we compacted the gravel (we didn't have a tamper so we went old school and used cinder blocks)so it was level and ready for the next step.
 Here are the boys at work...
 They got tired, so me and Katrina stepped in to finish the job!  hehe (this is what Andy calls a photo opp)

Step 5:
We laid down 5 bags of paver base or coarse sand over the pea gravel. Then, compacted again...


 Did I mention how great Chris and Katrina are for helping out?! They are great workers!!!
We checked to make sure we were level and then continued on with step 6.


Step 6:
After the paver base was compacted, we laid 4 bags of fine leveling sand or paver sand on top and then...you guessed it...compacted it.


You can see we only compacted the outer edge...the middle will not have anything sitting on it so it will be fine. Also, we will use the extra sand in the middle to level out the pavers as we go.

Step 7:
Start laying the first row of pavers.  We bought our pavers (chiseled front in harvest gold)from Lowes in the garden department.  We ended up needing 62 pavers for our pit. Make sure to have your level ready because you want every stone level front to back and side to side and level with the other stones around the circle.  It is worth it to take the extra time here and make sure the first row is perfectly level.  If you do the first row right, every other row will fall into place.
You can see in this picture we are laying the stones and checking level to see where we need to add or take out sand from each paver.  You can specifically see Katrina packing some more sand under the paver to lift it up level with the other pavers. This was the most time consuming part, but again it is worth the time! Once you have your first row set and completely level you are ready for the next step!

Step 8:
 We are dry fitting our pavers. What that means is, we did not use any mortar or construction adhesive to glue the stones together.  The pavers had a lip on the back that we faced down over the back side of the stone below it.  Once the circle is complete the stones are locked into place.  You can push all you want they are not going anywhere! This gives us the flexibility to move it if we need to down the road without having to break up the stones.  Also, using construction adhesive is not a good option because when it is heated up it will release toxic fumes into the air... yuck! We offset our stones to give it more variation. The second row went so smooth until we needed to cut a piece down.  Luckily Andy is good with a saw and chisel...


 Andy measure the front and back of the gap and then marked his line to cut. Then got the circular saw out and used a masonry blade to cut through the stone. 

Step 9:
The third row went sooo smooth! We laid the stones and they were a perfect fit so we continues on with the forth and final row.  Again, Andy had to cut one stone down to size and we were done with phase one...

Step 10:
Dig out the outer circle for the seating area.  Here we only had to go down about 3 inches. Thank goodness, because it was a much bigger circle.

Don't cry Andy, you are half way there :-)

Step 11:
Once the circle is dug out, rake it to level and put down weed barrier or weed block fabric...you will be glad you did down the road!

Step 12:
Lay down a thick layer of pea gravel.  We have a stone yard a couple of miles away where we got our pea gravel.  A yard was just the right amount for our size sitting area. We drove the trailer down and had them fill it up. The wheel barrow came in handy hauling the gravel!

See that cute little mushroom looking table on the left in the photo above? That is the old tangerine tree! I couldn't just chop it down! My Grandma planted it; so I created a side table out of the trunk! I will show you how in my next post! Until then, good luck with your fire pit!